


E is for Eagle that soars in the sky...
The short "E" was covered on Thurs and we did the eurythmy verses from Kristie's "Sixth Sense Language" ebook. She has a cute little Aesop fable in there called, "Everyone Agrees to Peace" and the girls acted it out with little characters.
For the Fairytale, I told them Grimm's "Bremen Town Musicians". Charley had gotten the set for Christmas this year, so it came in very handy! We used our eco-twig house handmade by Syrendell.

We looked at our pictures in our two alphabet books and went outside to walk the forms. Since the girls hadn't walked "A" (just their rabbits did), they walked both forms and then we made the shapes of A and E.
For "A", we used acorns.


For "E" we used sea shells.


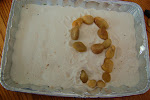
In our main lesson books, we drew a picture of eagle eggs, which emphasized both long and short "E".


On Friday, we covered the long "e" sound. I read to them a story by Clara Dillingham Pierson called, "The Bees and the Kingbird" from her book, "Among the Forest People".
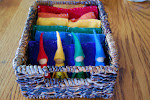
We then decided to focus on eggs with Easter just around the corner. We thought it would be fun to wet felt some eggs so they picked some wool colors...

And I grabbed some wool roving scraps...

And we headed outside with our bowl of very warm water and dish soap.

As a needle-felter, I do prefer that to wet felting, but it was a fun experience and the nice thing is you don't have to worry about little fingers getting poked!
You basically fluff up a piece of wool, keeping in mind that as it sets, it shrinks (about twice the size). Put dish soap in the warm water and soap it up, then immerse the "egg" in the bowl. Bring it out and roll it over and over in your hands, working the soggy mush into a tight egg ball.


When it starts to cool, dip it in the warm water again and keep working at it. It takes a bit of time, but eventually the fibers bind and felt and you end up with a small egg (or ball if you shape it into a ball instead).


Afterwards, rinse the soap out under running water (sink works best) and leave in the sun to dry on a bakers rack.
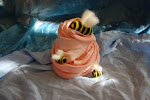
We also wanted to try making hollow eggs that we could cut open to put a special needle felted chickie in, so for that, get some plastic eggs that open, layer about 4-5 layers of wool around it and stick it in the hot soapy water. Work it gently with your fingers to bind the fibers.

Once the soft felting is done, you could rub it on a washing board. I didn't like this process so I went back to soft felting until I felt it was nice and tight.

And now I'm waiting for them to dry before cutting them open with scissors, removing the plastic and placing a surprise inside. It takes quite a bit of time to dry wet felt. I've heard of people sticking balls in the dryer to speed the process, but since these ones have plastic underneath, I'm just going to be patient. But if you plan to make these for Easter, start early so you have enough time for it to dry and decorate. You can wet felt designs on during the process before you dry them, or you can add your wool with a needle afterwards.
Another egg project is in the works and we had to solicit Daddy's help!

The girls and I don't eat eggs, so we waited until Daddy was ready for some good ole scrambled eggs.
If you want to save your eggs, you can blow the yolk and whites out. I won't fudge the truth, blowing out eggs is a pain and is pretty hard (so Daddy goes on duty for that)...pierce a hole on each end using a pin (a thimble also helps to push it through). Usually you make the blower hole slightly larger, for some reason. I really didn't take the time to look up why, but my mother always did it this way.

The put it to your lips and blow!

Once you're done, rinse the eggs out, inside and out and leave to dry.

We'll be making some Ukrainian eggs this week. I also have another egg project to share later this week, as well, so the egg section is TBC!
I used to use blown eggs in Kindergarten and I have some tips:
ReplyDelete1. Use a large crewel needle, ie a needle longer and a bit fatter than your normal sewing needle.
2. Poke the small end and leave that hole small. Turn it around and poke the bigger end. Push the needle in and wiggle it around until you think the yolk is broken.
3. Take a pair of cuticle scissors and clip a little more away around the big end. Blowing should be a breeze! LOL!
I used to make egg candles. Rinse the eggs out, let them dry. Melt paraffin or beeswax (or a combination of both). Beeswas was too expensive for me back then. Color the wax with crayons. I used Crayola, because I didn't have access back then to fancy wax coloring that you can probably get very cheap in the hobby stores now.
You need medium size wicking. You can use that big needle for this. Pull the wicking through from the little hole to the big hole. Pull the wicking through until you have enough on the small end to tie one or two big knots. Leave about 1/2" beyond the knot on the small end. Use a pencil, small twig, chopstick or whatever you have. Carefully tie the loose end of the wicking around the stick and draw it as tight to the big hole as you can (without, of course, breaking the shell!) Might take some practice. Put them small end down back in the egg carton. Carefully pour the warm/ hot wax into the big hole with whatever you can think of that will work, a small funnel or anything with a small spout that you don't mind getting waxy. This is not something that the children can do. fill to the top. Later (like overnight) when the wax is cooling, it will sink down in the middle and you may need to fill some more.
When the wax is totally cool, you can peel off the shells and trim the wick at both ends. The children can use bits of beeswax to make decorations. Or, if you are doing this as a surprise, you can take the cans of colored wax and use old or cheap paint brushes to paint pictures on them. Older children could probably do this, but it is hot wax and recquires a bit too much patience for the little ones because you have to do a little bit and let it cool before doing a little bit more. I used to build it up sort of like veil painting.
I know you have already blown out those eggs, but hopefully it will be easier next year!
PS - I have painted blown eggs with regular acrylics - little Easte pictures and strung them to hang on an Easter Egg Tree!
ReplyDeleteChristine - great suggestions! I'm still confused as to why one end should have a bigger hole - lol! And we originally tried a crewel needle, but DH said it wasn't sharp enough...I tried to stick a skinny skewer to break it up inside, but I broke some of the shell - drat! He's going to blow some more as I'm sure the girls will go through these quickly. We have acrylic paints and watercolors, so we'll try both!
ReplyDeleteAnd LOVE your tutorial on making beeswax egg candles! I need to order up some beeswax, but have parafin for another craft, so maybe I'll just try that! I'll post pictures if I get to it (always so many plans and not enough time!)
Thanks for posting all this!
Well, the little hole is for you to blow into and the bigger hole is for the egg stuff to come out! : ) Otherwise, the gooky stuff either won't come out, or someone will pop a vein trying!
ReplyDeleteAny sewing or craft store will have large, sharp needles.
I was always fine with the regular paraffin. I never could light them, anyway! I used to paint white pillar candles. Unfortunately, I don't have them and didn't take pix. The dark ages before digital! Someday, maybe : )
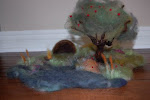
Oh, by the way, are you going to grow grass gardens? Medium to large red clay flower pot saucer, a little potting soil and wheat berries. Soak the wheat berries, moisten the soil and set them in indirect light until they sprout. Then move them to the window sill. They will sprout nice grass for your bunnies and eggs to nestle in! I think you want to do this about 4 or 5 days before Easter.
By the way, if you have ever read the original "Gulliver's Travels", do you remember the "Big-Endians" and "Little-Endians"?
PS - about the felting around the plastic eggs. I really don't think the dryer would melt the plastic. I would recommend wrapping the wool around it tightly, maybe filling it first with beans or rice and scotch taping it. That way, the weight would make the eggs bounce and bang more, knocking the wet out faster. Then, put the wool egg down in the tip of a "stocking" knee-hi and tie it tightly to hold the wool on tight. Just try it for 10 - 15 minutes at first, but I don't think the plastic will melt. That warning is usually more with plastic diaper pants (in the old days) or plastic sheeting. : )
ReplyDeleteLots of great egg fun! I love this time of year.
ReplyDeleteMany, many years ago, when we lived in a farawy island, I came across egg shaped candles and decorated them with cuttings from colored beeswax tablets. For years, I have looked and looked for egg shaped candles! And there they were inside the REAL egg shells all along. Oh my!
ReplyDeleteThank you Christine! I've been waiting for you.
And thank you Jen for a beautiful and inspiring blog. And for being and bringing amazing and creative and generous people to us.
Wondering if anyone might have a good leprechan story or a Saint Patrick story that is suitable for the young (three and four year olds)
Warmly,
Lisa
Christine - I wrote you a response that got lost when I tried to post it last night - ahhhhh...anyway, yes, we do grow the dish gardens. We are doing that on Thurs with a group of younger homeschooled children. And no I never read Gulliver's Travels, though I remember the cartoon that they used to show on "The Banana Splits" and loved it! I will have to read it now :D
ReplyDeleteAnd do you have a story in your vast arsenal for St. Patty for ages 3-4+ for Lisa?
Lisa, your new blog looks wonderful! We do like Tomie dePaola's "St. Patrick" book, but it's not suitable for 3-4 yr olds (quite wordy). If you can't find a book for that age, I would suggest getting some of his legends together (like how he drove the snakes out of Ireland with a drum) and just tell it to your little ones, making it age appropriate, of course :D
Here's a link to a children's site:
http://www.dltk-holidays.com/patrick/about.htm
If you google his legends it might come up with some that you could rework for your children's ages. I'll email Christine, in case she doesn't see this and I'm sure she could whip something up, if she doesn't have it ready at hand. She's so amazing! And I'm so glad you mentioned to her that you've been waiting for her, as well! I think we all have and I'm trying to convince her of that - lol!
Blessings to you and to Christine!
Jen,
ReplyDeleteThank you, you are very kind. I'm still working on putting snapshots on my blog.
I am enjoying this discovery of blogs and blogging, so rich with ideas, support and a window into Waldorf education that we never had before, outside of schools. It is a very different place from the Waldorf Homeschooling world I knew some twelve years ago on our remote tropical island.
Christine, what a shining jewel you are! Come out and gleam in the light. You have such rich contributions to make.
Jen, your link brought me to all sorts of resources for St. Patrick's Day, thank you.
The Shamrock as Holy Trinity is new to me, very interesting and makes sense. Wonder what is the fourth petal about in the lucky shamrock?
If a sweet story comes to me, I will post in on my blog or maybe Christine will do one on her blog.