


Continuing our egg adventures, we decided to sit down during our handwork session and make little nests with wooden eggs today.
First one of my gypsy princesses got on her silk veil with a silk flower hairpin we made last year for my sil's wedding...

Then we set to work. We got out our tiny wooden eggs.

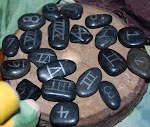
The girls picked Easter colors and each painted four with acrylic paints.


I decided to go with our Stockmar water color paints and ended up just dropping my whole egg into the container for a minute.


With needle felting, it is important to always remember that the direction you push the needle in, must be the same direction it comes out. Otherwise, you will break the needle (don't worry - happens to us all!)...


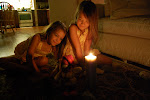
While the eggs were drying, we got out our needle-felting tools to make our nests. For needle-felting, you need a foam pad, your wool, and a needle or tool. For my girls, I have found the "Clover Needle Felting Tool" with the fine needles works really well for careful children because it has a plastic safety clip around the needles which retracts when in the unlock position as you push down on it.
Usually the girls use a single needle with a wooden handle, but for this project, we decided to try the clover.
Usually the girls use a single needle with a wooden handle, but for this project, we decided to try the clover.

With needle felting, it is important to always remember that the direction you push the needle in, must be the same direction it comes out. Otherwise, you will break the needle (don't worry - happens to us all!)...
The needles are extremely sharp, so I wouldn't recommend them for young children (under 6 or 7) or ones who move quickly or are careless. It takes patience and concentration. Even though my girls have been needle felting since they turned 6, they have been carefully monitored. Now, they need less supervision. Some Waldorf circles don't recommend needle felting at all with young children as the punching motion might be too grounding. Others seem to see it as part of beneficial handwork and creativity.

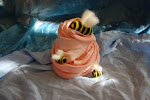
As we were shaping our nests, we added some moss to it for a more authentic look.


Once the nests were finished, the eggs were dry and polished with beeswax.


As we were shaping our nests, we added some moss to it for a more authentic look.


Once the nests were finished, the eggs were dry and polished with beeswax.

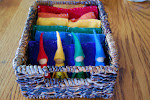
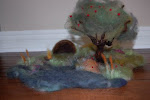
Here is the finished product!


And then we went outside to place them in the trees.


Couldn't resist this cute picture of our Farley who turns 12 on St. Patty's Day! My Welsh/Irish lad :D


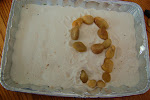
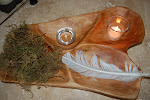
And here is a shot of my nest with the eggs after watercolor painting and polishing. I will be adding them to my new etsy shop (will be having a give-away in celebration!)


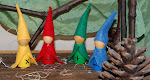
We had so much fun, we removed our oceanscape from our Nature Studies Block and set up a spring seasonal table. We got out our beautiful sprites from Syrendell. The girls and I purchased them natural and then painted them ourselves.


We had so much fun, we removed our oceanscape from our Nature Studies Block and set up a spring seasonal table. We got out our beautiful sprites from Syrendell. The girls and I purchased them natural and then painted them ourselves.


And now, we wait for spring!

Oh my goodness, those eggs are beautiful, I would love to make everything! Great job, you amaze me!
ReplyDeleteThis is beautiful! I love your seasons table and the little nests are adorable.
ReplyDeleteWhere do you get the natural eggs?
Hi Patzi, natural wooden eggs (in various sizes) are available at many crafting stores (try Beverlys, Michaels, etc). I didn't see them listed on their online shops, but the Beverly's by us sells them. Some etsy shops do sell various sized eggs as well. If you have trouble finding them where you live, let me know and I'm happy to pick some up for you here!
ReplyDeleteI love those nests and eggs Jen, they are beautiful!! I was so happy to see that you now have an Etsy shop! Welcome to Etsy Mama!!
ReplyDeleteHave a wonderful day,
Warmly
Linda
ohh what a lovely activity and a beautiful nature table!!
ReplyDeleteBesos
Love the idea of the felt nests and the colored eggs. That's such a cute idea! How did you get the eggs to dry without sticking to the paper towels? I always have trouble with that part.
ReplyDeleteOh thanks so much Linda! It really is a fun adventure and I love how it involves the children, as well. Love how you've added those adorable wooden characters in your shop now, btw! :D
ReplyDeleteThank you for your sweet comment, Sylvia!
Nicci, yes, the paper towels thing is a bit tricky. You have to kind of time it to *roll* them gently when they are just about dry, but not quite there yet. Also if you don't overpaint them, I've noticed it helps. My girls have gotten better at that and it does make a difference. With the eggs being so small, they held them up while painting and the side they started with was the side they placed the egg down on. As far as watercolor - it doesn't really stick like the acrylic does, which is a bonus! I thought about using a bakers rack to dry the eggs, but then you'd get little lines from the metal, so you could always remove the paper towel if part of it got stuck on there, sand off that side of the egg until it's smooth again and then redo that side. :D HTH!
so creative, Jen, your blog always inspires me : )
ReplyDeletegreat to see Farley, too!
LX
your nature table looks GORGEOUS!!
ReplyDeletei love that brilliant blue of the eggs, off to visit your shop...